If you've been using EZNEC for any length of time you probably have a collection of model files all of which have XYZ coordinates set via straight numeric values. Wouldn't it be nice to change all the XYZ coordinates to be set via variables and formulas without having to recreate all your models from scratch and without having to manually replace each numeric value with an appropriate formula?
This section shows how to use AutoEZ to "variable-ize" any existing model that has fixed numeric values for the wire XYZ coordinates.
Quad, all-numeric to all-formulas
Begin by opening sample model "Quad All-Numeric.ez".
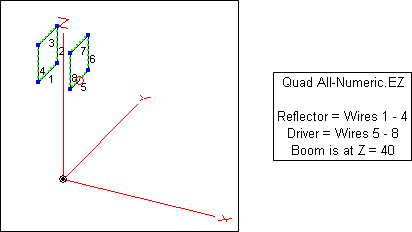
This is a quad with the boom at 40 feet above Real/Average ground. And yes, it is very similar to the quad used in previous examples but it could be any model with all-numeric XYZ coordinates.
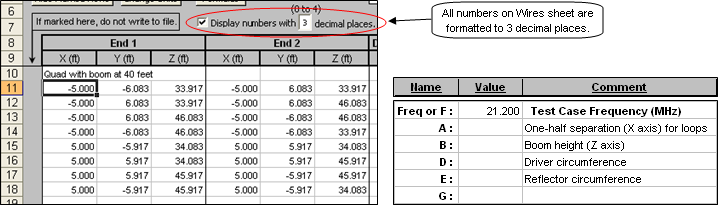
Below on the left is a portion of the Wires sheet. In this example all numbers have been formatted to 3 decimal places. This "lines up" the decimal points which makes the numbers easier to read. Any numbers with more than 3 decimals are displayed as rounded, any numbers with fewer than 3 decimals are displayed with extra zeroes. You can change the number of decimals or you can clear the check box to show the "as is" values.
To begin the process of "variable-izing" this model, tab to the Variables sheet and make entries in the "Comment" column for four variables, as shown below on the right. (You could use any variable names, I just chose the first four to make the screen capture more compact.)
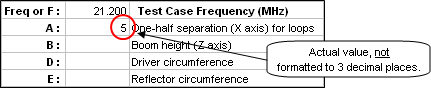
The next step is to set values for the four variables, for example set the value for variable A to "5". Of course the easiest way to do that is to just type "5" in cell C12 on the Variables sheet and then press Enter. Just for illustration here are a few alternate techniques.
Tab to the Wires sheet and select any of the "5.000" cells, then press
Ctrl-C (copy). Or, to avoid the need to switch your hand from the mouse to the keyboard, just point to any "5.000" cell,right-click , and select Copy from the context menu. Then tab to the Variables sheet. Now you can either select cell C12 and pressCtrl-V (paste), or you can point to cell C12,right-click , and select Paste from the context menu.Note that what shows on the Variables sheet is just "5", not "5.000". Under the covers, AutoEZ will remove any formatting like borders and number of decimals. That takes care of A.
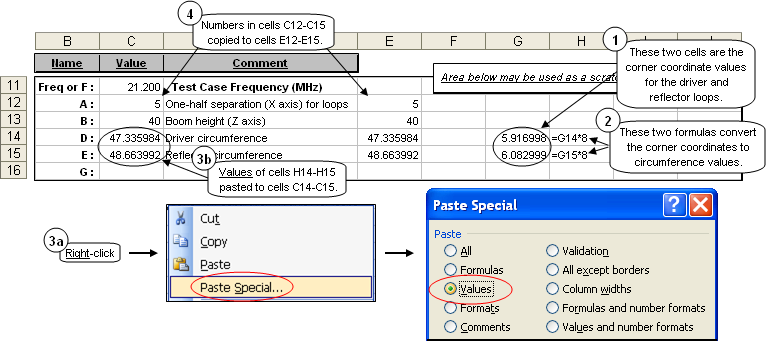
For the B value you can just enter "40" directly since presumably you know the boom height of the EZNEC model you created earlier. Now what about D and E, the circumference values for the driver and reflector loops? You could use your pocket calculator to do a "multiply by 8" with the values of cells C16 (driver corner coordinate) and cell C12 (reflector corner coordinate) on the Wires sheet, but this would be tedious and prone to errors if you had a multi-band, multi-element antenna with dozens of different coordinate values. Again there is an Excel trick. (As you read the next few paragraphs refer to the illustration below.)
On the Wires sheet, select cell C16 (driver corner coordinate) and copy/paste into a cell in the scratch pad area of the Variables sheet, say G14. Repeat for cell C12 (reflector corner coordinate) on the Wires sheet into the "next cell down" on the Variables sheet, G15. As before, note that the formatting for number of decimals is not copied and this time more decimals show rather than fewer.
In cell H14 enter the formula "=G14*8". Press Enter, then use the "fill handle" to fill that formula down to cell H15. The G14 reference in the first formula will automatically change to G15. Now you have the circumferences for the two loops in cells
H14-H15 without any chance of making an arithmetic error.The next step is a little tricky if you are not used to dealing with spreadsheets. You may be tempted to just do a normal copy/paste from cells
H14-H15 over to cellsC14-C15 in order to set the values for variables D and E. But with Excel, if the cell you copy from contains a formula instead of just a simple numeric value, when you do a normal paste the formula will be pasted into the target cell. You don't want that, you want to paste the value that is the result of the formula. Here's how.Start by copying cells
H14-H15 , either viaCtrl-C or by right-clicking and selecting Copy. Then point to cell C14,right-click , select Paste Special from the context menu (not regular Paste), and in the next dialog window select Values.You now have set the initial values for the four variables needed to completely define the driver and reflector loops. For reasons that will become clear in a moment, copy those four values into the cells just to the right of the "Comment" column. Here you can do a "normal" copy/paste since the cells being copied contain just simple numeric values.
This is just an example of how you might do things. If you have a more complicated antenna you may prefer to group together all the variables that control spacing on the boom, then all the variables for multiple reflectors, then all the variables for multiple drivers, and so forth. Or you may prefer to group together all the variables (reflector, driver, directors) that control one band and then all the variables that control another band.
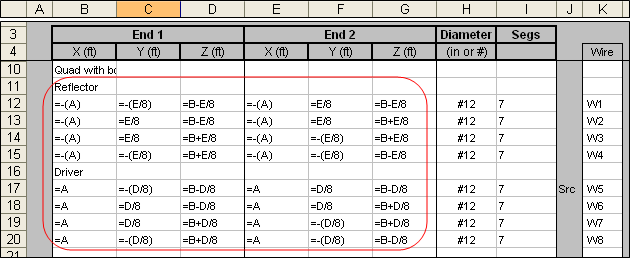
The final step in "variable-izing" the two loops is to replace the
End 1 andEnd 2 XYZ coordinate numbers with Excel formulas. That's a total of 48 formulas to enter (3End 1 and 3End 2 times 8 wires), not a trivial task. So tab back to the Wires sheet and click the Formulas button. (Make sure you click the Formulas button on the Wires sheet, not the one on the Variables sheet.)A new sheet tab, TempEdit, will appear. As the name implies, this is a temporary sheet where you can both view and edit multiple formulas. In addition to the button on the Wires sheet there are separate Formulas buttons for each table on the Insr Objs sheet and for the Variables sheet.
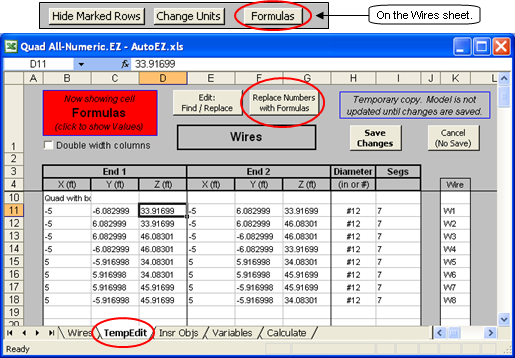
Begin by selecting a cell to be modified, in this example cell D11 which is one of the reflector corner coordinates on the Z axis. As such it is affected by both the boom height (variable B) and the reflector circumference (variable E). With that cell selected, click the Replace Numbers with Formulas button near the top of the TempEdit sheet.
Remember: Unlike some other modeling programs that permit the use of variables for wire XYZ coordinates, with AutoEZ you are not limited to just a simple variable name in place of a numeric coordinate. You can use a simple formula or a formula that includes mathematical operations. You don't have to define "intermediate variables" to do the mathematical operations.
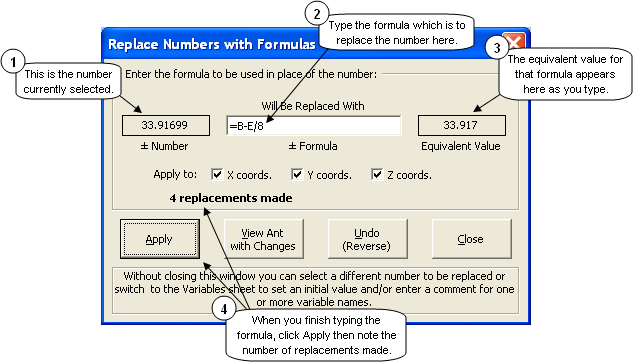
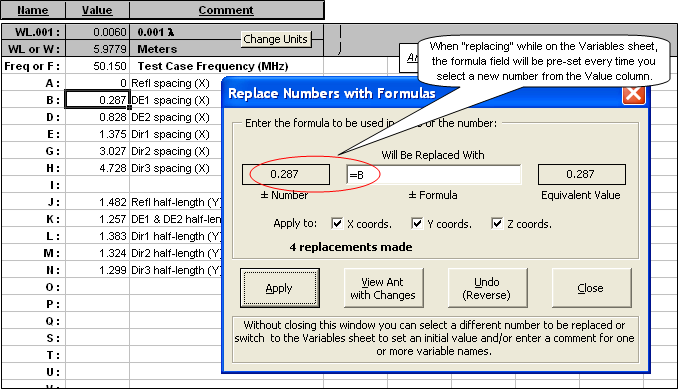
In the dialog window that appears, type any valid Excel formula. If you can't remember which variable(s) to use you can tab to the Variables sheet without closing the dialog window. (You can also make new entries on the Variables sheet, perhaps to add another variable, set an initial value, and/or modify a comment.) As you type the formula it will be evaluated and the result (the value that is the result of the formula) will appear in the box on the right. This lets you see that you are entering a valid formula using the appropriate variable name(s). Variable names may be entered in upper or lower case.
When you are done typing the replacement formula click Apply. AutoEZ will 1) scan all numbers in the
End 1 andEnd 2 X, Y, and Z columns (unless you have chosen to exclude some coordinates from the scan), 2) match numbers that are within 0.01% (1/100 of 1%) of the currently selected number, both positive and negative, 3) replace the number with the formula you entered or its negative equivalent, and 4) keep a count of replacements made.Note the number of replacements. If it is not as expected you may have inserted formulas into unintended cells. In that case click the Undo button and investigate. You might have to exclude one of the XYZ coordinates by "unchecking" the appropriate box and try again.
The "matching numbers" need not be an exact match, only within the tolerance mentioned above. Many times when working with complicated models the last digit of a coordinate will change without you noticing it. This usually makes no difference in the model calculations.
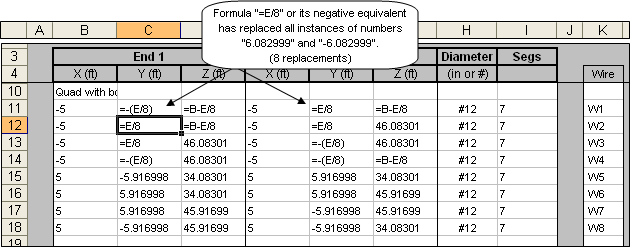
Also note that both positive and equivalent absolute value negative numbers will be replaced. For example, if you selected cell C12 ("6.082999") and replaced that number with the formula "=E/8", all the instances of both "6.082999" and
"-6.082999" would be replaced with the appropriate formula.
Without closing the dialog window, click on a different number to be replaced. Type the appropriate formula, check the equivalent value box to make sure you used the correct variable name(s) and the correct mathematical operation(s), if any, click Apply, then verify the number of replacements. Repeat until there are no more "straight numeric" XYZ entries.
Besides checking the equivalent value box and the number of replacements made you can also click the View Ant with Changes button to make sure that wires are not shooting off in directions you did not intend. When you use that button AutoEZ will construct the model that is to be sent to EZNEC based on the current state of the TempEdit sheet, not the Wires sheet.
With a relatively few mouse clicks and keystrokes you've now replaced all 48 XYZ straight numeric coordinate values with formulas. You might also wish to use the Insert Row(s) button to add comments identifying groups of wires and/or add a comment to show which wire has the source, as seen below in cells B11, B16, and J17. You can also do this kind of annotation when you return to the Wires sheet.
After you are done modifying the model be sure to click the Save Changes button. On the other hand, if you discover that you've made unintended changes from which you can't recover just click the Cancel (No Save) button.
Of course the whole point of this exercise is so that you can now tab to the Calculate sheet, set up a series of test cases with changes to variables A, B, D, and/or E and see the results. The reason you copied the initial values for the variables into the cells just to the right of the "Comment" column on the Variables sheet is so that you can keep track of the original state of the model as it was before making any changes.
Enough with quads. The next example, mercifully shorter, will deal with a Yagi for 6 meters.
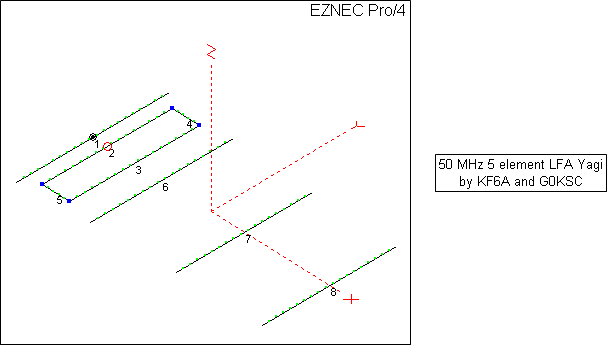
50 MHz LFA Yagi, move DE1/DE2 loop along boom
This is a model by KF6A based on an original design by G0KSC. The design uses a loop as the driven element rather than a single wire, hence Loop Fed Array or LFA. In this example we'll "variable-ize" all of the X and Y coordinates. This is a Free Space model so all Z coordinates are 0. The center of the reflector, wire 1, is at coordinate position (0,0,0) as marked by the small black circle. The intersection of the X/Y/Z axes lines is not (0,0,0), indicated by the use of dashed as opposed to solid red lines for the axes.
Wires 2 and 3 are called Driven Element 1 (DE1) and Driven Element 2 (DE2). In this case the feedpoint, identified by the small red circle, is at the center of DE1 although in other designs it might be at the center of DE2. Wires
6-8 are normal directors. All wires have the same diameter (15.88 mm, 0.625 in) except the ends of the loop which are slightly smaller (12.7 mm, 0.5 in) to allow for telescoping adjustments.
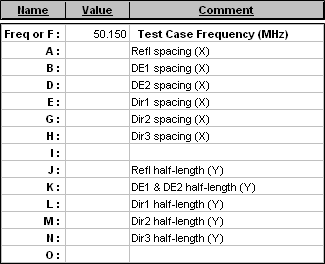
As with the previous example, the first step is to open the "all numeric" model that you wish to convert, in this case sample "KF6A 5EL50-LFA.ez". Then make entries in the "Comment" column of the Variables sheet so you can keep track of what variable is to be used for what purpose. You'll need six variables for the six unique X coordinate values and five more variables for the five unique Y coordinate values.
Then copy/paste the numerical coordinates from the Wires sheet to the "Value" column (column C) on the Variables sheet. But don't copy the values one at a time, that will drive you crazy.
You could use the trick of holding down the Ctrl key while making multiple selections of non-adjacent cells on the Wires sheet.
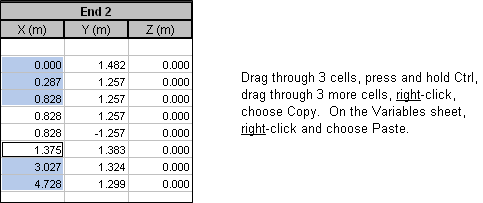
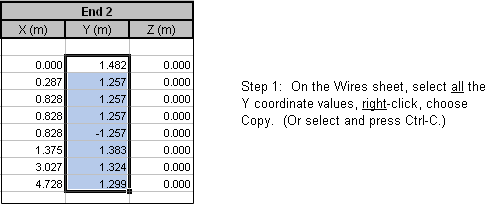
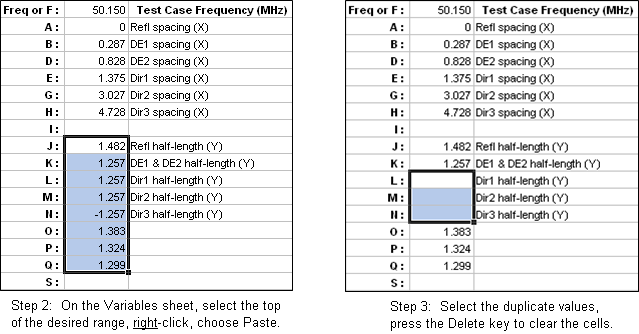
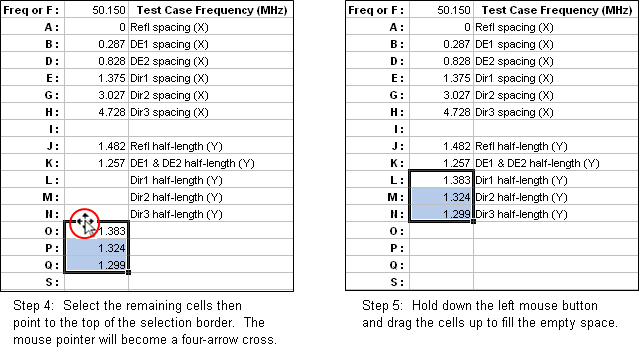
But as with most things in Excel there's another way to do the same thing, outlined below. (In the illustrations below it is assumed you have already copied the six X coordinate values and now you want to do the five Y coordinates.)
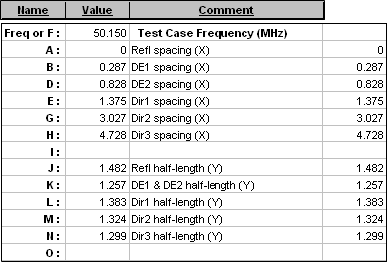
Also as with the previous example, copy all the original values over to the right of the "Comment" column so you'll have a record of where you started. When you're done the Variables sheet might look like this. If you're wondering why most of the coordinate values still show 3 decimal places it's because the original numbers on the Wires sheet had exactly 3 decimal places to begin with.
Once you have the Variables sheet set up correctly, return to the Wires sheet and click the Formulas button. On the TempEdit sheet click the Replace Numbers with Formulas button to start making replacements.
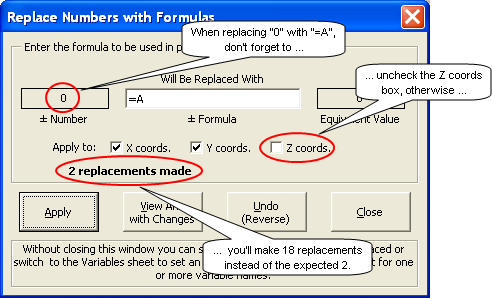
Caution: If you decide to replace the reflector X coordinate ("0") with a formula ("=A"), don't forget to uncheck the "Z coords" box. Otherwise you'll replace all the Z coordinate values ("0") as well.
Here's another tip. Once you have the "Replace Numbers with Formulas" dialog window showing you can tab to the Variables sheet. The dialog window will stay open and you can select numbers from the "Value" column. In this case (replacing while on the Variables sheet) the formula field in the dialog window will be filled in automatically with the variable name that is to the left of the number you have selected. You can verify the formula and make changes if necessary, click the Apply button, then select another number and repeat. At any time you can tab back to the TempEdit sheet, perhaps to check your progress, then return to the Variables sheet so that the "Comment" column can serve as a reminder and also so that the formula field in the dialog window will be pre-set.
You can make replacements while on the Variables sheet as well as the TempEdit sheet.Don't forget: If you are making replacements while on the Variables sheet, when done don't forget to tab back to the TempEdit sheet and click the Save Changes button.
That's it. Now you can create "what if" test cases on the Calculate sheet. All dimensions of the model (except the Z coordinates which stay at 0) are controlled by variables. However, you might want to get creative in how the variable values are set.
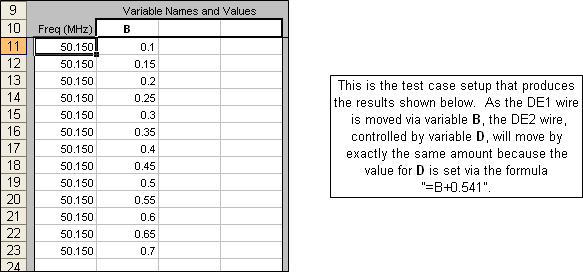
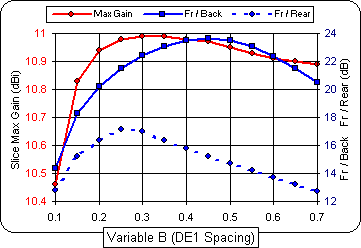
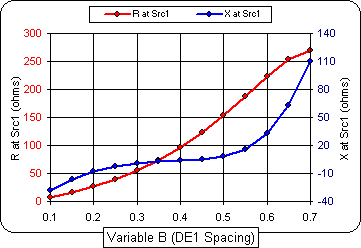
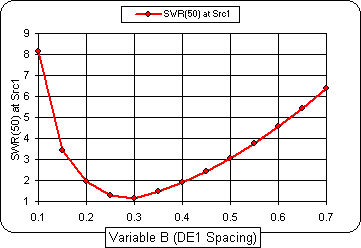
For example, suppose you wanted to experiment with moving the DE1/DE2 loop back and forth along the boom while keeping the shape of the loop the same. You could set up test case rows using both variable B and variable D and change the values by the same amount, but that's double the work and prone to errors. Instead, on the Variables sheet set the value for D to the formula "=B+0.541" where 0.541 is the original separation between DE1 and DE2. Then as you move DE1 (variable B) with test case rows, DE2 (variable D) will change by the same amount.


(Press Esc to stop the animations, F5 to restart/resync.)
Special note to Excel 97 users only: The use of the AutoEZ "Replace Numbers with Formulas" feature as described in the previous examples is severely limited under Excel 97. On the TempEdit sheet you must select a new number to be replaced, invoke the dialog, type the replacement formula and apply it. Then close the dialog and select a different number to replace. Also, you cannot do replacements from the Variables sheet.